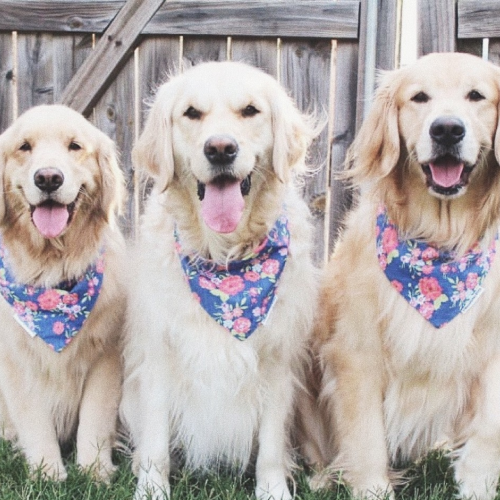
Categories
Insights

Sourcing + selling custom keychains

Keychains are a functional and stylish accessory and now you can source and sell this specialty product. The TeespringGo service includes inventory sourcing, storage, product photos, and listing creation. We’ll even handle order fulfillment + delivery + customer support for you too.  

Just like lapel pins, keychains cannot be produced on demand. This means you purchase inventory upfront before your listing is created.

Part 1: Design your keychain 

There are two different keychain types to choose from. First decide which type you want to sell. Below you’ll find a menu of customization characteristics for metal and PVC keychains. Please note all keychains will feature clear plastic bag packaging.

Which keychain type is best for you?

  • Metal: Metal keychains are constructed in various materials and feature a key loop. They’re a functional and durable keychain option and provide a high-quality look and feel. 
  • PVC: PVC keychains are crafted in different colored plastic polymers and finished with a key loop. They’re a fun and fanciful product and provides the chance to incorporate vibrant colorful elements into your keychain designs. 

Design files

Whichever option you choose, the design file requirements are the same. Vectorized design files are preferred, but we can accept JPEG, .JPG, .PNG, .AI, .EPS,.PSD, .TIFF and .PDF design files. We recommend submitting high resolution files (300 DPI) with at least 2.5” x 2.5” (750 x 750 pixels) dimensions. If you’re not able to submit a design file through the form you can provide a design link in the comments section of the form instead. When creating designs intended for enamel keychains we recommend using RGB / Pantone color system.

Sizes for both keychain materials:

Something you will want to keep in mind when creating your keychains is the size of it. From as small as 0.5 inches wide * 0.5 inches long; and as large as 3 inches wide * 3 inches long. Size options/combinations for width and length (e.g: 1.5 inches long * 1 inch wide):

Long:

  • 0.5 inches
  • 1 inch
  • 1.5 inches
  • 2 inches
  • 2.5 inches
  • 3 inches

Wide:

  • 0.5 inches
  • 1 inch
  • 1.5 inches
  • 2 inches
  • 2.5 inches
  • 3 inches

Option 1: Metal keychains

When submitting your metal keychain request these are the characteristics you’ll need to choose. Continue reading to learn more about each one. 

  1. Keychain style
  2. Color options
  3. Ring and chain style
  4. Finishes
  5. Ring and chain finishes
  6. Quantity and pricing  

1. Metal keychain style 

  • Soft enamel: Soft enamel is our most popular keychain type. Its defining characteristic is having colored paint recessed into the metal mold—giving the keychains a dimensional look and textured feel people love. These keychains are a great option for simple designs.
  • Hard enamel: Similarly to the soft enamel option, colored paint is used to fill a metal mould. However the difference is that the enamel is polished down to give the keychain a smooth flat surface.
  • 3D mold: 3D mold is ideal for creating striking, three dimensional keychains. This keychain type offers depth of detail with multiple surface levels at multiple angles to create a three dimensional look and feel. It’s best for designs of animals, objects, shapes, etc. Please note 3D mold keychains cannot feature any custom colors—the color of the keychain is based on the finishing you select.
  • Glitter enamel: This process is exactly the same as soft enamel, however glitter is mixed into the paint before pouring into the mould. This gives the keychain a fun and sparkly look, which may work well with your chosen design.
  • Glow in the dark enamel: Again, this is the same process as soft enamel. Glow in the dark additive is added to the paint, which adds an extra element of interest to your keychain. 

2. Color options 

We offer 3 different color options for your metal keychain. 

  • No color: If you want your keychain to just have your chosen metal finish, you can choose the no color option—for this option keep in mind that you’re only able to choose the 3D mold option. 
  • One-sided: Having color on one side is the most popular choice, with the reverse being smooth metal, please note using a design with 5+ colors increases the base cost  of the keychain.
  • Double-sided: You can also choose to have your design on both sides, please note using a design with 5+ colors increases the base cost  of the keychain.

3. Ring and chain style

Choose between 6 options of ring and chain styles so that your keychain can look and function to your preference.

4. Finishes

Metal finishing is used to treat the exterior of the keychains by applying a thin complementary layer to its surface. Spring offers 12 different finishing options to choose from. 

5. Ring and chain finishes

You are able to choose your ring and chain to have either standard nickel or brass finishes. There is an option to upgrade your ring and chain to match the keychain, but keep in mind this will incur an additional cost. 

6. Quantity 

Below is a price reference table. This is an example of price ranges for soft enamel keychains with less than 5 colors and no add-ons. Please note these prices are not exact—they simply provide an indication of price range. Keychain type, number of colors, size, etc. will determine the base cost. Your pin’s base cost may be slightly lower or higher than the table below depending on the characteristics you choose.

0.5″ W – 1″ L = 0.5 inch width and 1 inch length

Option 2: PVC keychains

When submitting your PVC keychain request these are the characteristics you’ll need to choose. Continue reading to learn more about each one. 

  1. Keychain style
  2. Color options
  3. Ring and chain style
  4. Quantity and pricing  

1. PVC keychain style:

There are three style options for the PVC keyring, this will again depend on your design and preference. 

  • One-sided: The first option to have your design on one side, with the reverse being a flat surface. Features standard 4mm thickness.
  • Double-sided: The second option is for your design to repeat on both sides of the keychain. Features standard 5mm thickness.
  • 3D design: Finally the most popular option is to have a full 3D design made from a custom mould. Features standard 5mm thickness.

2. Color options:

You can have up to 12 different colors included in your PVC keychain. Simpler designs such as logos or text work well with the 1-3 or 4-6 color options. If you have a more detailed design, we recommend choosing 7-9 or 10-12 colors to keep as much detail as possible.

3. Ring and chain style

Choose between 5 options of ring and chain styles so that your keychain can look and function to your preference.

4. Quantity and prices

Below is a price reference table. This is an example of price ranges for a full 3D PVC keychain with up 7-9 colors and no add-ons. Again, keep in mind that these prices are not exact—they simply provide an indication of price range. 

0.5″ W – 1″ L = 0.5 inch width and 1 inch length

Part 2: Source & sell inventory

Here’s a breakdown of how the sourcing process works.

1) Submit request

Once you’ve unlocked keychains you’ll see the ‘Metal Keychain’ and ‘PVC Keychain’ product icons in the Launcher. Fill out the form with your keychain characteristics and submit your request. We aim to process all requests within 24 – 48 business hours.

2) Order inventory

Once we receive your submission we’ll send you a deposit payment link for $50. Once the deposit is paid we will process your request and follow up with an exact quote and product mockups. When you approve the keychain mockups and quote we will send you another payment link for the total inventory cost (minus your deposit). Once full inventory payment is provided your keychain order will be processed.

3) Start selling

Keychain production takes between 35-50 business days and inventory will be sent to our facility in the US. We’ll create product mockups for you and make sure to set the listing to ‘private’ so you can make it public and start selling when you’re ready.  We can also send a keychain to you if you’d like to create promotional material or videos for the launch.

Pricing recommendations + fees

You decide how much profit you want to make per keychain. We charge a service fee which covers storing your inventory (up to 60 days from last sale), creating product mockups, fulfilling orders, and handling customer service for you. Our service fee is 15% of the selling price (minimum $2). Normally keychain retail prices range from $7 – $20. Pricing should depend on the base cost of your keychains and how much you think your audience will pay for this custom product.

For example, you source 1,000 keychains with a base cost of $2.80 each. You pay $2,800 total. The selling price for each keychain is $9. Spring’s fulfillment fee is $2. Therefore, your profit margin would be $9 (selling price) – $2.80 (base cost) – $2 (service fee) = $4.20 profit per keychain. This means once you sell all your keychains you earn $4,200 in profit.

Categories
Insights

How to create product designs with Placeit

Want to create products to sell but don’t have a design? Not to fear! Teespring has teamed up with Placeit to help sellers create quality product designs, lifestyle mockups, and even promotional assets too!  Also, you’ll get 20% off your monthly subscription for life with Teespring (use the button below to sign up). 😉

Why do Teespring sellers like Placeit?

  • No graphic design skills required
  • You get unlimited designs, mockups, videos, promotional assets, and more for under $15 per month

Create product designs

Create custom product designs in minutes using Placeit’s pre-made, customizable templates. Save and download your design to apply to multiple Teespring products. Make sure to select a transparent background too so it’ll look great on any product you add it to.


Create lifestyle mockups

After you’ve created your product you’ll need images to share! You can use Placeit to create custom lifestyle mockups featuring real people and a variety of product positioning. These images are perfect for sharing on social media. You can even create custom video mockups too.

Create promotional assets

Choose from thousands of stunning, professionally designed ad templates and assets to promote your products across all social media platforms. They are ridiculously easy to modify and the generator lets you take one design and with a single click, download images formatted for every platform.

Categories
Insights

Merch shelf customization at individual video level

After releasing YouTube’s Merch Shelf in June 2018, thousands of creators rushed to Teespring to start selling custom merchandise under their YouTube videos. Until recently, creators could only organize 12 of their products on their shelf under all of their videos at a given time. Now, you’ll have the option to showcase different merch under each video or to remove merch from an individual video entirely. The new capability adds a whole new dimension to in-video product promotion, increasing conversion rates, and buyer confidence.

How to organize your Merch Shelf

If you don’t choose a specific item order for individual videos, your merch will be arranged in the same way as your channel. The following instructions will tell you how you can choose the item order for individual videos.

To arrange your shelf for an individual video

  1. Sign in to YouTube Studio beta.
  2. In the left-hand menu, click Videos.
  3. Click on the video where you want to customize your Merch Shelf. 
  4. In the left-hand menu, click Monetization.
  5. Click the Merchandise tab. You’ll only see this option if your channel is eligible.
  6. Click Organize on the ‘Status’ card.
  7. Drag, drop and order up to 12 items. Viewers may see fewer items depending on the device that they’re using. On desktop: The first 4–5 items will appear, and viewers will have to interact with the shelf to see more items. On mobile: Only the first item is displayed on mobile devices. Viewers can see the other items by interacting with the shelf.
  8. Click Done.
  9. In the top right-hand corner, click Save.

To go back to channel-level arrangement

  1. Sign in to YouTube Studio beta.
  2. In the left-hand menu, click Videos.
  3. Click on the video where you want to remove video-level customisation of your merch shelf. 
  4. In the left-hand menu, click Monetisation.
  5. Click the Merchandise tab. You’ll only see this option if your channel is eligible.
  6. Click Organise on the ‘Status’ card.
  7. Drag and drop all items back to the inventory list or clear the selection.
  8. Click Save.

If you want to go back to an automatic arrangement, you will be able to do so at channel level.

Youtuber and Streamer Aphmau’s Merch Shelf.

We want to continue making it easier to customize your Merch Shelf and personalize this experience for your fans. Stay tuned for more updates!

Categories
Insights

The plushie guide: how to source and sell

We’ve simplified the process to help you source and sell custom plushies seamlessly with TeespringGo. Check out the video below to see how easy it is to design and sell your very own plushie with Spring.

Our team will help you design your prototype and source inventory using the option that works best for you. We’ll also handle inventory storage, listing creation, order fulfillment + delivery, and customer support too. 

How to create the perfect plushie

Learn more about each customization option below. Keep in mind, you can also request custom add-ons to your plushies (ex. accessories, collars, collectables, etc.) when you submit your request.

Concept

Before submitting a request you should have a clear concept of the plushie you want to create.  The more details you provide the better. In most cases, creators will submit a design file (EPS or PNG) along with a graphic that illustrates what they want the plushie to look like once created. In this example we can clearly see the size, resting position of the plushie, colors, etc.

Example of an image featuring product specifications that should be submitted with a request

Stuffing + material

Most plushies are constructed using a soft velour/velboa plush material and stuffed with a special hypo-allergenic polyester material, which makes them super huggable! It is also possible to use beans (100% propathene) to stuff your plushie. Our team will recommend the best stuffing and material options available to help you achieve the overall look you’re going for.

Resting position

We can create plushies in any position. The most common positions are standing, sitting or laying. We may recommend a certain stuffing option in order to achieve the position you want.

Size

We can create any plushies in size. The most common range is between 6 to 16 inches. Keep in mind anything larger than 16” will incur more transport costs from production and increase shipping costs for fans.

Eyes  & nose

Choose the eye and nose options best suited for your plush—we offer embroidery or plastic. Please note the use of plastic will lengthen prototype turnaround time by 1 – 2 weeks due to safety test requirements. We are not able to use additional plastic, metal or wire materials in other areas of plushies due to safety concerns.

How to sell custom plushies

Here’s a breakdown of how the process works once you’ve designed your plushie.

1. Submit request

Fill out the form with your plushie characteristics and submit your request. We aim to process all requests within 24 – 48 business hours.

2. Approve quote & prototype

Once we receive your submission we’ll send you a non-refundable deposit payment link for $250. This deposit will go towards the prototype cost and any leftover funds will go towards inventory costs. Once the deposit is paid we will process your request and follow up with a prototype mockup and quote for approval. It’s important to note that the quote includes inventory transport costs and the cost of safety certifications required to sell your plushie.

Once you approve the prototype* mockup and quote it can take up to 30 calendar days for the prototype to be created and shipped to you. *Please note if you require multiple prototypes due to design modifications this may require additional payment if the $250 does not cover the cost of all additional prototypes.

3. Source & sell

You have two options for sourcing and selling plushies.

Option 1: Pay for inventory upfront

When you approve the prototype the next step is to pay for the full inventory order (minus what’s left of the deposit). Once full inventory payment is received your plushie order will be processed and we’ll confirm the estimated delivery time for your plushies to reach our facility. Depending on the quantity of plushies, inventory will arrive within a few weeks or months. Please note we also recommend ordering an additional 5% of inventory for replacements and exchanges.  

One inventory reaches our facility we’ll take product photos and create the plushie listing for you. We’ll make sure to set the listing to ‘private’ so you can make it public and start selling when you’re ready. You can sell your plushies until stock runs out. 

Option 2: Run a pre-order campaign
  • The pre-order option is there for creators who are unsure how much inventory to order or would like to avoid paying for inventory out of pocket. This enables you to avoid the risk of sourcing too much inventory or having to pay thousands of dollars for the products upfront. 
  • After approving the prototype, you’ll need to confirm the minimum order quantity (MOQ)—i.e. the minimum number of plushies you plan to sell. Note the MOQ must be at least 100 units. 
  • Next, we’ll create a pre-order landing page for fans to reserve their plushie. Pre-order campaigns usually run two to four weeks.
  • We’ll inform your community of the estimated delivery timeline for their order on the landing page and within confirmation emails. We’ll also advise them of the minimum order quantity on the landing page so if the MOQ isn’t reached they’ll understand why their order is canceled. 
  • After the pre-order period ends (and MOQ is reached), we will use the funds from plushie reservations to pay for the inventory. Please note we also recommend ordering an additional 5% of inventory for replacements and exchanges.  
  • Depending on the quantity of plushies, inventory will arrive within a few weeks or months. At that time we’ll send the orders to your buyers. Once orders are dispatched your profit will be available for withdrawal. 

Please note, if you do not achieve the minimum order quantity required by the end of the selling period, all orders will be cancelled and buyers refunded. 

4. Get Paid

After all plushie orders are shipped to buyers, profit from sales will be available for withdrawal within your Spring account. 

Pricing  recommendations

Normally a plushie’s base costs range  from $6 – $12 but keep in mind there are many factors that can impact price like the combination of size, accessories, materials, etc. Also, any custom add-ons you request (outside of what is available in our catalog above) will increase the base cost of your plushie. 

You will decide how much profit you want to make per plushie. The most common plushie selling prices range between $15 – $30. Teespring charges a fulfillment fee which covers storing plushie inventory (up to 60 days from last sale), creating product mockups, fulfilling orders, and handling customer service for you. Our service fee is 15% of the selling price (minimum $2).  Pricing should depend on the base cost of your plushie and how much you think your audience will pay for this custom product. Let’s look at an example of how much profit you could make selling plushies:

  • For example, you source 1,000 plushies with a base cost of $10 each.
  • You pay $10,000 total for the full inventory order.
  • The selling price for each plushie is $25.
  • Teespring’s fulfillment fee is $3.75 (because 15% of $25).
  • Therefore, your profit margin would be $25 (selling price) – $10 (base cost) – $3.75 (service fee) = $11.25 per plushie.
  • This means you’ll make $11,250 in profit once you sell all your inventory.